The premise:
I wanted to acquire a Pac-Man arcade game in 2020, but this was a most complicated year, and no one was willing to ship the game to me, whether in upright or cocktail (sit-down) format. Being unable to have someone ship the game, and being holed up at home due to unforeseen circumstances, I decided to build my own cabinet.
Although I have an original Pac-Man PCB, I opted to acquire a Namco Class of 1981 (Ms. Pac-Man, Galaga, and Pac-Man accessible through a secret combo move) because of the ability to play three games in one cabinet. The Namco board gives the build an authentic feel, not to mention it is a licensed Namco product, so you can claim some bragging rights.
Upon deciding that a cocktail cabinet would best suit my needs, I searched for plans to have the wood cut. I can work with electronics, but wood is not my forté. While searching, I found a vendor who had what I needed and was willing to ship: Haruman's Customs (https://www.harumancustoms.com). I purchased one of the kits in Baltic birch plywood to stain it after assembly; I thought it would look better than with a wood overlay or decal.
Several weeks after purchase, the disassembled cabinet arrived in the mail. I proceeded to inspect the pieces, do a quick and dirty assembly.
After the Q&D assembly, I decided to use glue and also reinforce the cabinet with screws.The next step in the process was to install the control panel assemblies. The kit came with thick wooden panel assemblies as opposed to metal panels. This will come into play (ha!) later in the process.
Unable to resist temptation, I perform another Q&D, a mock-up of the controls. Looking good thus far!
Both panels are in place. As opposed to the original cocktail designs where the top panel and side open gracefully as if it were a vintage motor vehicle, this model's top remains fixed while a side panel opens for access and service. Given the fixed nature of the top panel, I proceeded to install corner braces to hold the panel in place aside from using glue. I also installed some wood inserts to reinforce the sides, the control panels and the top.
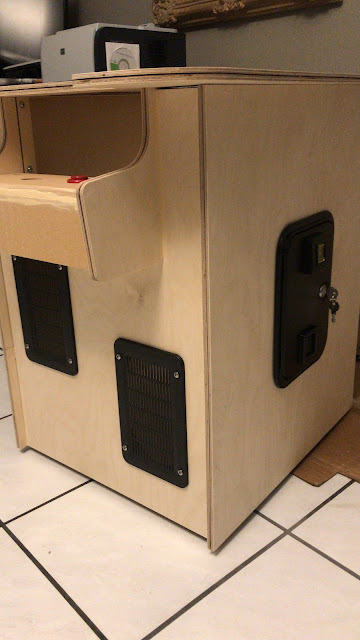
I placed the grilles in their respective holes/cutouts for presentation purposes, and they look great.
Next up was the coin door. I ordered the small, single-coin insert variety. This is a real door, as opposed to plastic ones on sale on some websites. I don't plan to put this on location, but it should have the proper coin door.


Everything was coming along nicely at this stage. The keen eye will notice I used some wood filler on the control panels, as there was a slight gap, being a two-piece affair.
I had a 19"display that I purchased on a whim to build a table arcade (the monitor would be in the center of the top), but the cocktail build calls for a 20" 4:3 aspect ratio monitor, hence the difference in real estate when doing a side-by-side comparison shot. The 20"monitor is simply outstanding when viewed at any angle, easily outperforming the 19" shown.
The 20" monitor was disassembled and installed from the bottom of the cocktail top, which makes for an excellent fit.
I was getting antsy, as some time had passed by and I had not yet hooked up the electronics. I hooked up the PCB to a video converter card, which in turn connected to the monitor. I powered the system up, and was elated to see a game over / demo screen. It lives!
After getting a little boost from seeing the game turned on, I proceeded to think experiment on the bottom of the cabinet with the stain, wondering how many applications or passes would be needed to reach the desired color. It seemed like two passes would yield the desired results. Also, since the cabinet was upside down, it was time to install the levelers.
In addition to staining on the outside, I decided to stain the inside of the cabinet as well. Granted, it will not be seen by just about anyone other than myself when servicing, but why not.
Once the stain dried and the clearcoat (yes, I did it) cured, I installed the T-molding. It was a bit tedious considering all the curves a cocktail cabinet has, not only on the top, but on the control panels as well.
With the T-molding installed, I was just about done with the tedious-to-me part, the cabinetry. The next part, electronics, was much easier for me.
The PCB is very small when compared to a vintage PCB; it occupies only a fraction of the space, which is perfect since I needed to install a video converter card. In the picture you may notice the card has RGB and VGA outs; I used the latter.
On to the spaghetti. The JAMMA harness is rather long, but much appreciated given the twists and turns and right angles that the wiring had to deal with, being a cocktail table.

I eventually finished the wiring, except for the coin door. I have had the setup on free play since day one, but will one day finish wiring the coin mechs. I still had yet to secure the top to the cabinet, but was pending the installation of the white plexis that go in front of the controls. My goodness, this was probably the most stressful part of the entire installation, as they wouldn't just slide into place. I had to tap them into place with a hammer and a block of wood. It didn't occur to me to test fit them on the control panel assemblies prior to installing said assemblies. I thought I was about to break the plexis more than once, but patience is a virtue. The picture below barely shows the Player 2 plexi installed. Once done, I then secured the top to the cabinet.
I was left with installing the glass top. I went to a glass shop and had them cut a thick piece of glass for the table. Not in the pic are the clips that secure the glass in place. I decided not to install a decal or silkscreen on the top, at least for now, given it looks so nice stained.
I decided to finish it off with just a little flair, purchasing a lighted Pac-Man and Ghosts topper.
As for future enhancements, I will install an interior lighting kit behind the plexis and wiring the coin mechs. Further down the pike, I might just replace the control panels with metal ones.
Thanks for reading!